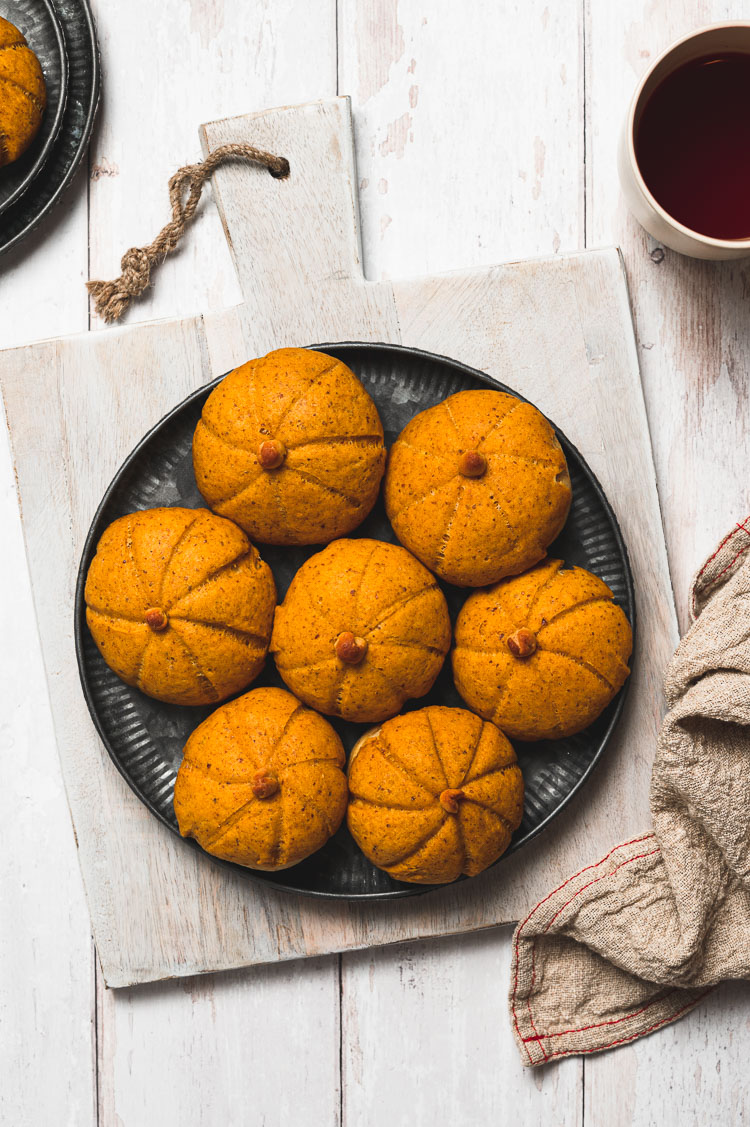
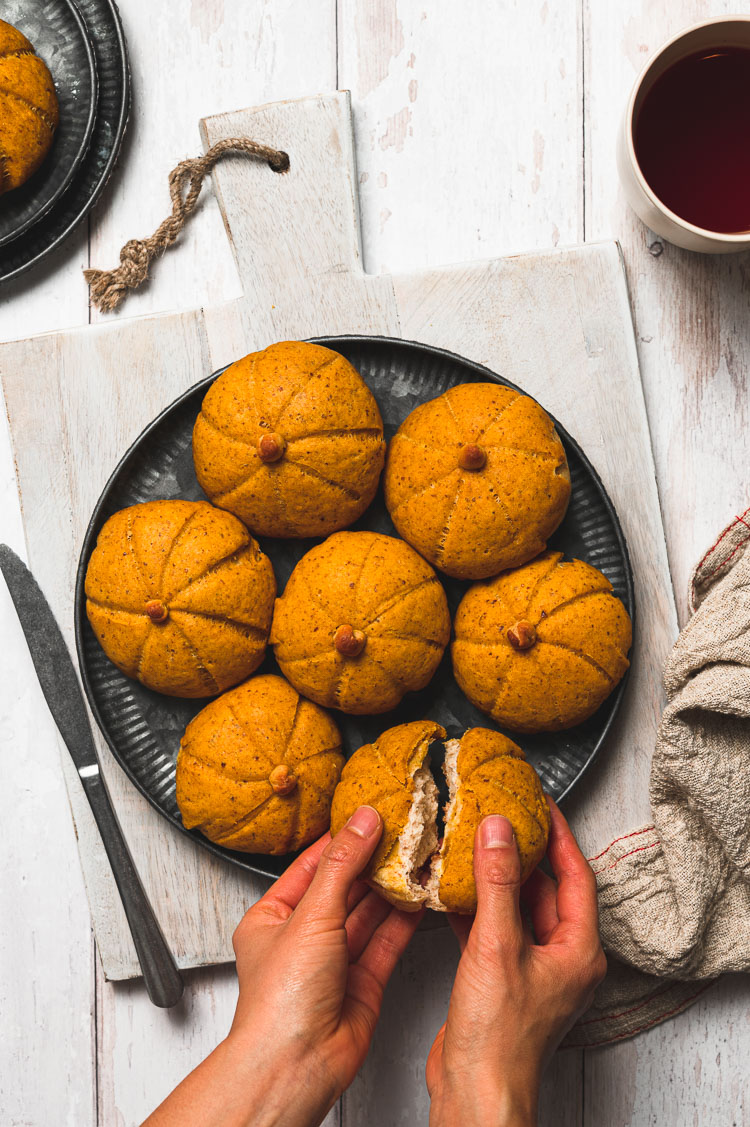
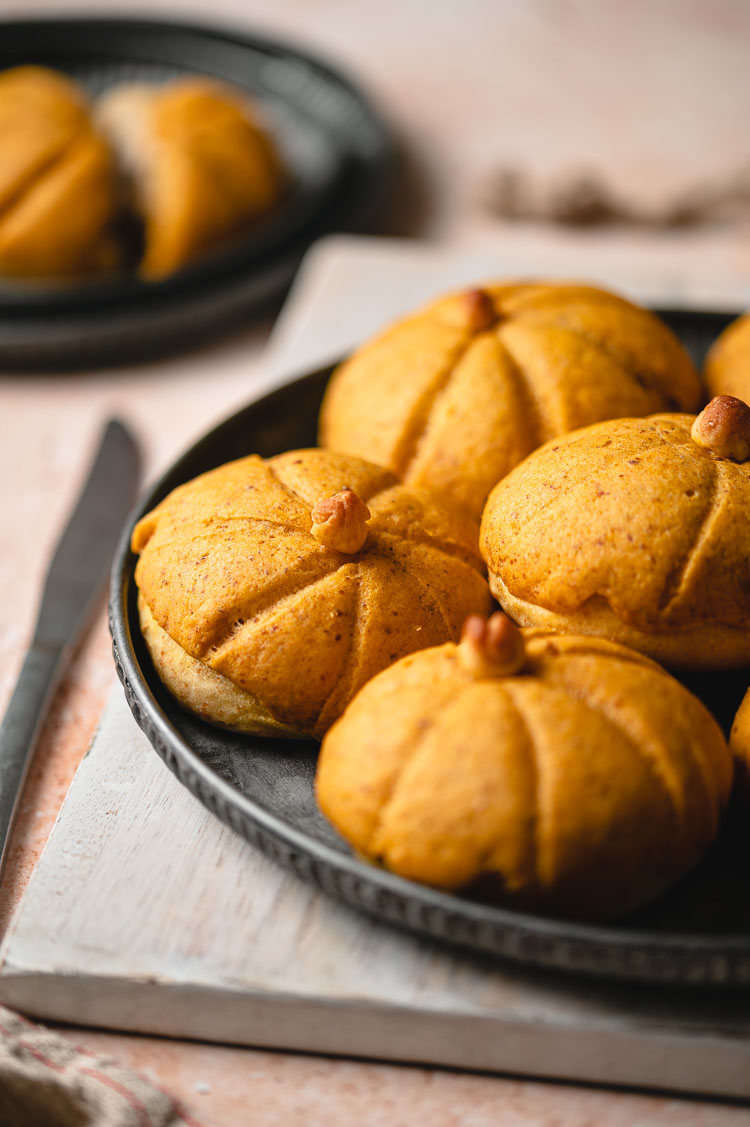
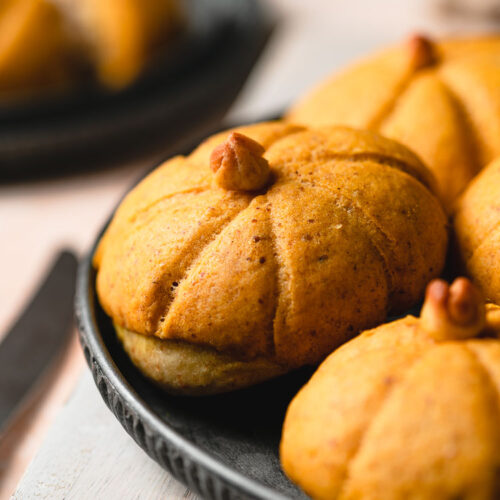
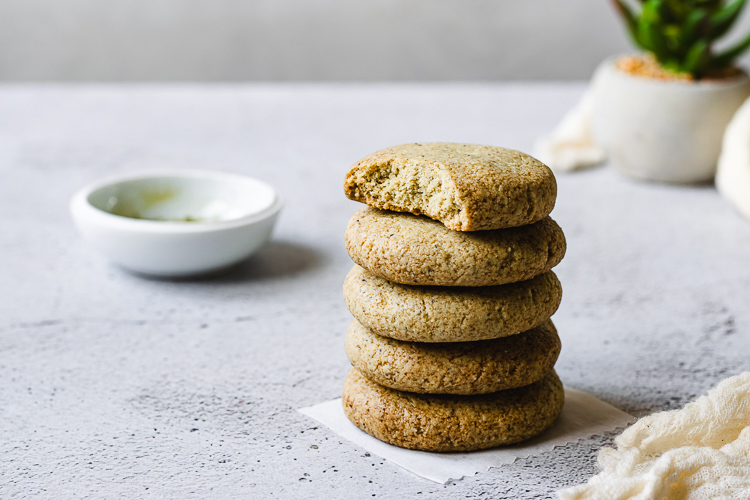
Vegan Pumpkin Melon Pan | ヴィーガンパンプキンメロンパン
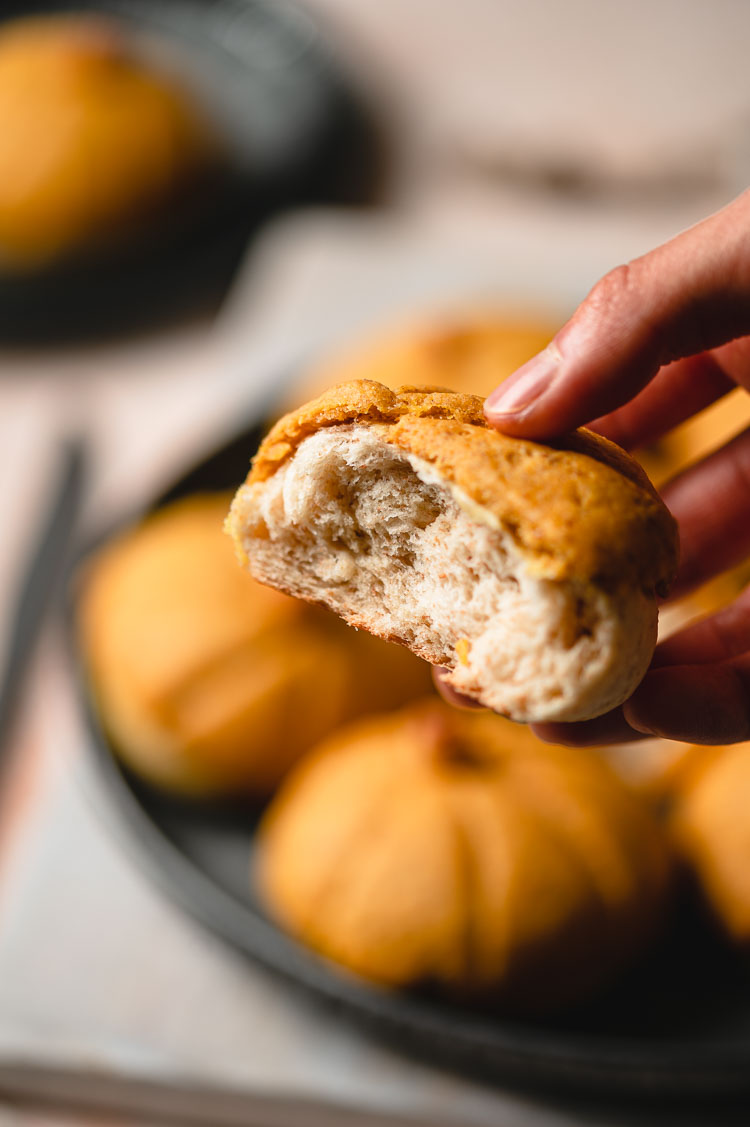
This vegan pumpkin melon pan is a fun fall twist on Japanese melon pan! Soft, fluffy bread hugged by a lightly spiced pumkpin cookie crust.
What is Melon Pan?
Melon pan (pronounced “pahn”) is a type of Japanese kashi pan, or sweet bread. Pan (パン) means bread, and despite having melon in its name, it doesn’t actually contain melon. The crust on top is usually cut in a way that resembles a melon skin, hence the name melon pan. They’re similar to Chinese pineapple buns and Mexican Conchas in that the idea behind them is the same — a sweet milk bread wrapped in a cookie crust. I posted a recipe for classic vegan melon pan a few years ago, but I couldn’t resist making a pumpkin version this fall.
Melon Pan FAQ
What’s the difference between Melon Pan and Pineapple Buns?
Pineapple buns and melon pan are very similar. Though I’ve never had a pineapple bun myself, from some research it seems that pineapple buns are usually more rich, with a buttery, flaky crust more akin to a pastry.
What’s the difference between Melon Pan and Conchas?
Melon pan and conchas are more similar than pineapple buns, with the main difference being the amount of crust wrapped around the bread. Melon pan typically has a higher crust to bread ratio.
Can I use all purpose flour instead of bread flour?
While I highly recommend using bread flour, all purpose flour can work in a pinch. If using all purpose flour, use unbleached if possible, as I find bleached all purpose flour doesn’t create gluten strands as easily.
Can I use vegan butter in the cookie crust?
Due to the extra moisture in vegan butter, I don’t recommend using it in the crust since it will make for a softer crust.
Tips for Success
Use a stand mixer if possible! ⟶ I have been kneading by hand for the last 3 years of my bread making journey, but recently used my Grandma’s old KitchenAid mixer and wow, it’s a game changer! My dough reached windowpane in no time and I didn’t have to worry about sticky hands. You can still make delicious bread by hand of course, so don’t worry if you don’t have a stand mixer.
Make sure your pumpkin puree is at room temperature ⟶ If it’s too cold it will freeze the coconut oil and your crust will not combine cohesively.
Chill the cookie crust ⟶ Because the cookie crust is made with coconut oil, it will start to melt if it’s left out in a warm environment (above 75°F) for too long. Chill the cookie crust while the dough proofs, and let it rest at room temperature for about 10 minutes before using.
Ways to use up your pumpkin…
- Whole Grain Pumpkin Muffins
- Pumpkin Chocolate Chip Mochi Cake
- Pumpkin Snickerdoodles
- Creamy Kabocha Soup
- Tofu Pumpkin Pie Squares (coming soon!)
- Pumpkin Oatmeal Cookies (coming soon!)
You can also add your leftover pumpkin to chili, curry, veggie burgers, vegan cheeze sauce, or swap it out for applesauce in vegan baking!

If you try out this pumpkin melon pan, don’t forget to leave a comment/rating down below and tag me in your photos on instagram @ellielikes.cooking. I love seeing all of your tasty recreations!
Vegan Pumpkin Melon Pan
Ingredients
Bread
- 2 cups (240g) bread flour**
- 2 tbsp (24g) granulated sugar
- ½ tsp (3g) salt reduce by 1/8 tsp if using salted butter
- 1 tsp (3g)
instant yeast* - ½ cup + 2 tbsp (150ml) soy milk
- 2 tbsp (28g) vegan butter or melted coconut oil
Cookie Crust
- 3 tbsp (40g) refined coconut oil softened
- ¼ cup (48g) granulated sugar
- ¼ cup (60g) pumpkin puree
- 1 tbsp (7g) ground flax
- ½ tsp pumpkin pie spice
- 1 cup (120g) all purpose flour
- ¼ tsp baking powder
Instructions
- PREPARE BREAD DOUGH: In a large bowl, mix together flour, sugar, salt, and instant yeast. Stir in milk and oil (if using) till combined, then turn out dough onto a lightly floured surface.
- KNEAD: Knead (with your hands or a stand mixer) until the dough comes together and become slightly elastic (about 5 minutes). If using butter, stretch the dough out into a small log and place small cubes of butter on top (or add directly to stand mixer). Roll up the dough and continue kneading. It will be very greasy at first, but just continue kneading and the dough will absorb the butter and become smooth.
- When ready, the dough should be smooth and just slightly sticky, but it shouldn't stick to your hands. (You can use the Windowpane Test to see if enough gluten has developed. You can also test the elasticity by poking the dough — it should bounce back.) This should take about 15-20 minutes of kneading by hand, or about 10 minutes in a stand mixer. If using a stand mixer, check the dough often since it is possible to over-mix the dough.
- PROOF: Roll your dough into a ball and place in a large greased bowl. Place a tea towel or plastic wrap over the bowl and let the dough rest until doubled in size. I place mine in the oven on the "proof" setting, but if yours does not have this setting you can simply just turn the light on. You can also leave it out at room temperature, but your rise may take longer. The warmer the environment, the faster it will rise. (Don't rush it though. Flavors deepen as the dough proofs.) You can also place it in the fridge and allow it to rise overnight if you'd like to bake it fresh in the morning.
- PREPARE COOKIE DOUGH: While your dough is rising, prepare your cookie dough. Cream together coconut oil and sugar, then beat in flax and pumpkin puree until well combined. Sift in flour, baking powder, and pumpkin pie spice. Mix until a uniform dough forms. Form dough into a ball, wrap with plastic wrap, and place in the fridge. Take the cookie dough out of the fridge about 10-15 minutes before you assemble the melon pan. This will give it time to come to room temperature and soften. You want your cookie dough to be rollable but not completely loose.
- CHECK BREAD DOUGH: My dough usually takes about 1 ½ – 2 hours to proof on the kitchen counter. To test if it is done, poke a hole in the center of the dough with your finger. If the hole doesn't close back up, it's ready.
- PUNCH DOWN: Punch down your dough and flip onto a non-stick surface. Divide the bread dough into 8 pieces and roll each into a ball.
- ASSEMBLE MELON PAN: Divide the cookie dough into 8 pieces. Roll each out into a flat disk shape. Place one bread dough ball in the center of one disk. Wrap the cookie dough around the bread dough so that it covers most of the surface. Repeat with remaining dough. **I save a small piece of dough for the "stems" on the pumpkin buns.
- CREATE PUMPKIN PATTERN: Make shallow cuts from the center of the cookie crust out towards the edge in a pumpkin pattern. Don't cut all the way through the crust. At this point you can also roll the cookie crust in some sugar (preferably coarse sugar) for a crunchier top.
- 2ND PROOF: Place the buns on a lined baking sheet and loosely cover with plastic wrap or a tea towel. Place in a warm environment and let rise for about 20 minutes. It should increase in size during this second proof.
- PREHEAT & BAKE: While the dough is proofing, preheat the oven to 350°F/180°C. Bake for about 15 minutes, until the cookie crust is firm and the bottoms are lightly browned. The bread should feel slightly firm but still soft inside. Transfer to a cooling rack and let the buns cool completely.
Notes

*Disclosure: This page may contain affiliate links. As an Amazon Associate I earn from qualifying purchases, but the price remains the same to you. Thank you for supporting Ellie Likes Cooking!
Save for later!

Oh mein Grott, ich habe gerade dein großartiges Rezept und dein Blog gefunde, ich muss das Rezept unbedingt nach backen!
Danke für die Gramm Angaben.
Grüße,
Gabriel
This was such a great and quick recipe! The base melon pan was fluffy and had a great golden colour after baking. I used canola oil and had to increase the second proofing time. My family ate the first batch within minutes.
I’m so happy you and your family enjoyed it! It’s such a fun treat to bake (and eat) in the fall 🙂