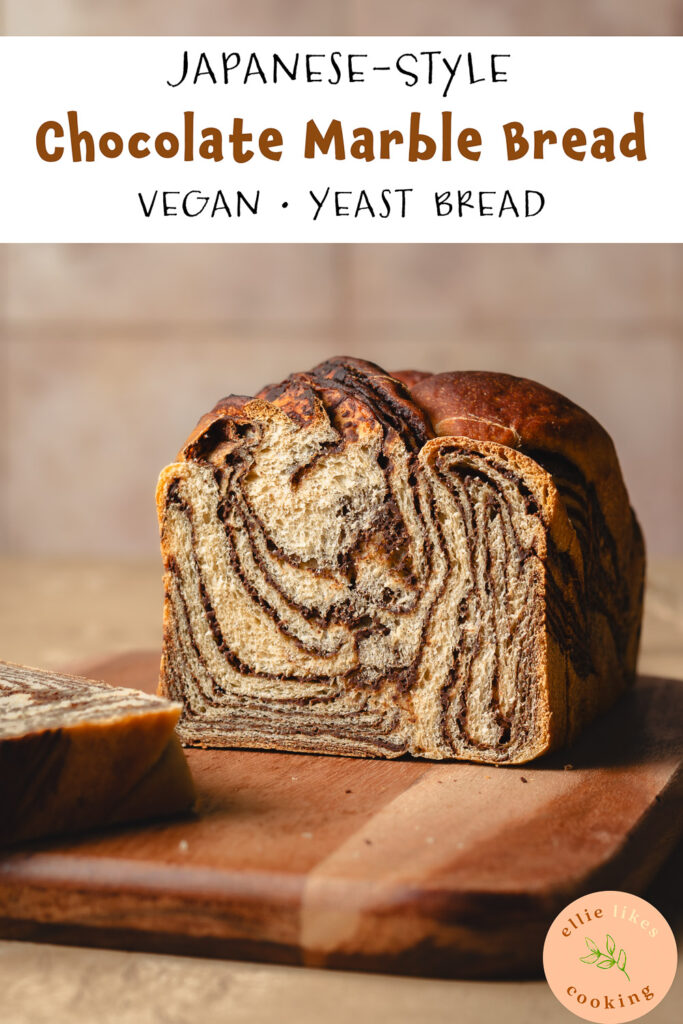
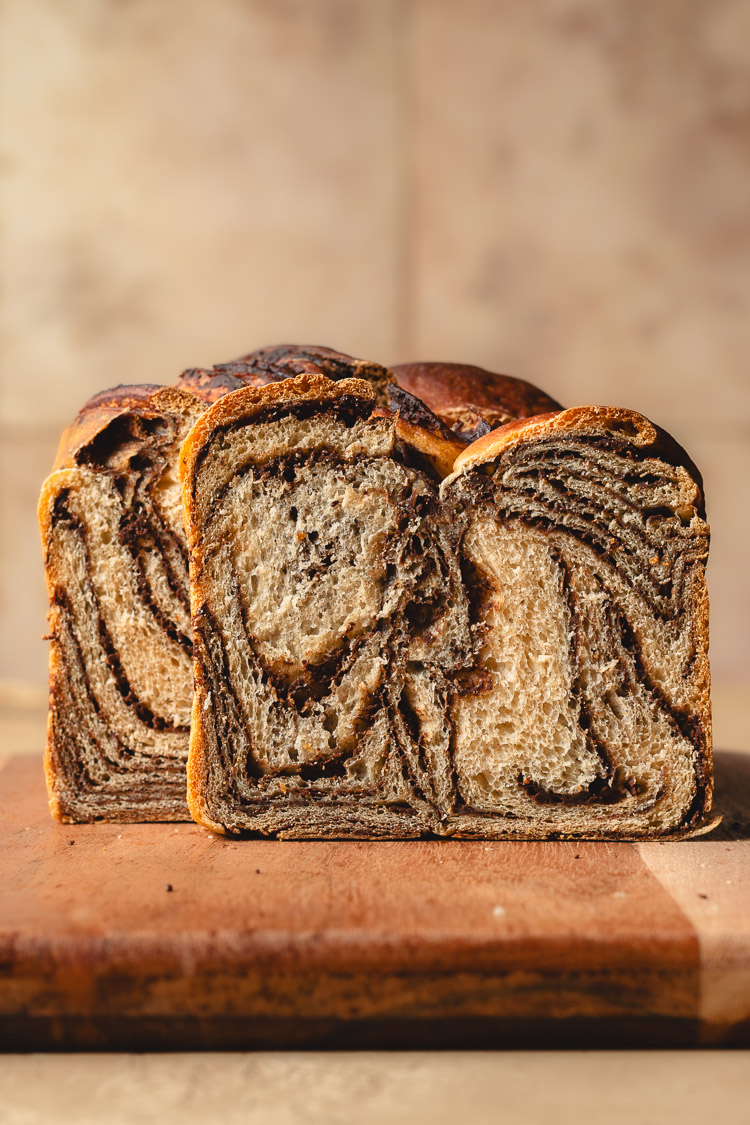
Vegan Chocolate Marble Milk Bread (Shokupan)
Soft, fluffy yeasted milk bread marbled with an easy chocolate sheet. A Japanese bakery classic made egg and dairy-free!
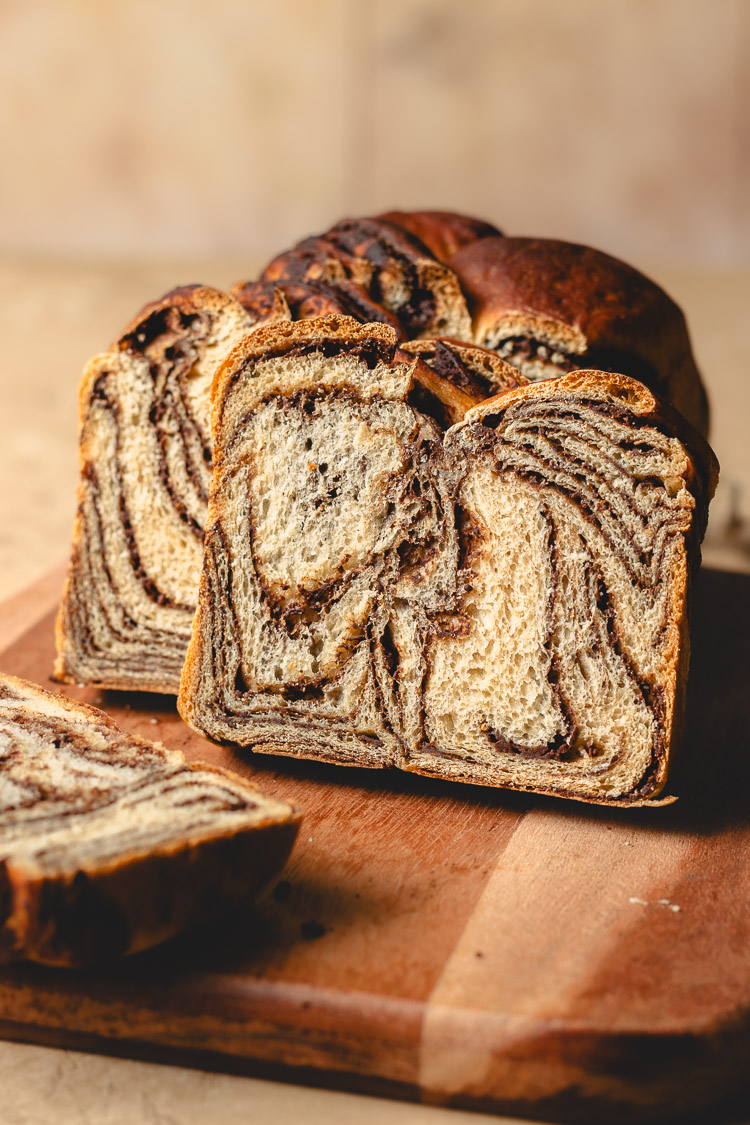
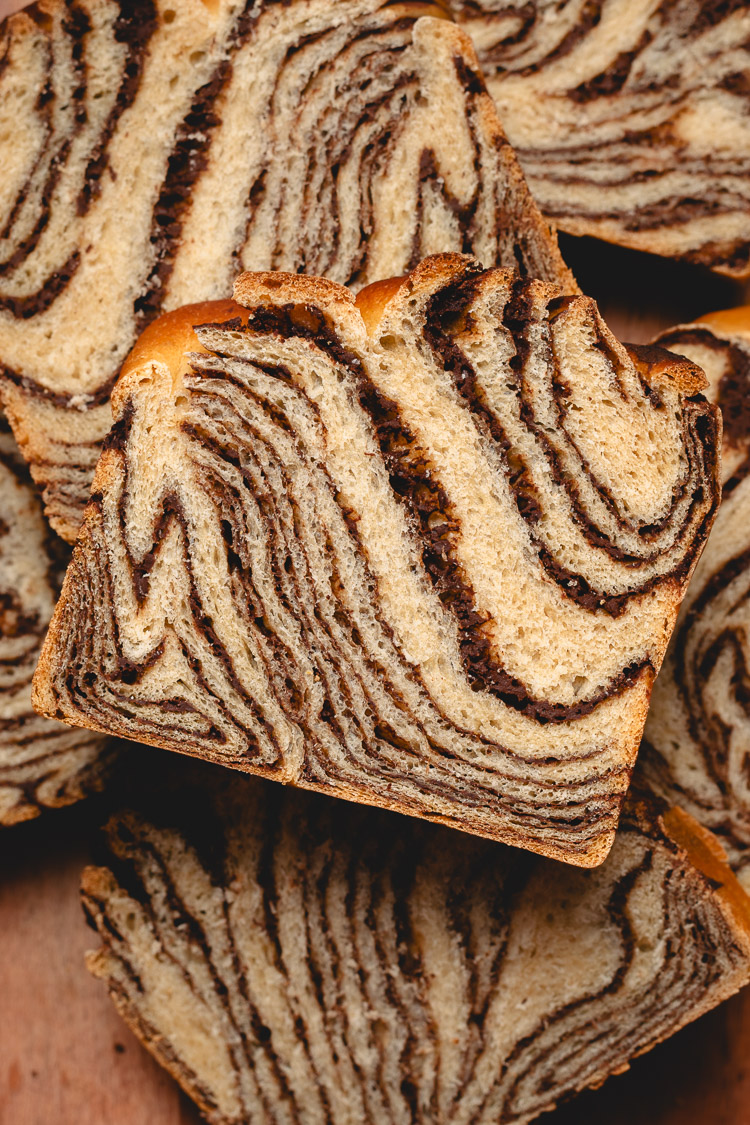
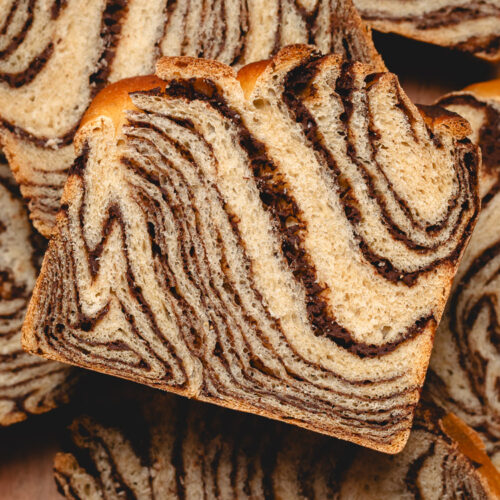
Chocolate marble bread is a popular item at bakeries in Japan, but it’s also not too difficult to make at home. It’s basically a Japanese milk bread (shokupan) with a chocolate layer swirled in. It’s soft, fluffy, a little bit sweet, and so good as-is, toasted, or with butter or nut butter. Unfortunately, most bakeries use milk, butter, and eggs in their bread, so I created a completely plant-based version that is still just as delicious!
How to Make
- Knead the dough until it passes the windowpane test. This is a higher hydration dough and requires lots of kneading to achieve a soft, fluffy bread. I highly recommend using a stand mixer if you can, it will be much easier than kneading by hand.
- Proof the dough for 1-3 hours at room temperature. If it’s particularly cold in your kitchen, you can put the dough in a turned off oven with a small pot of boiled water.
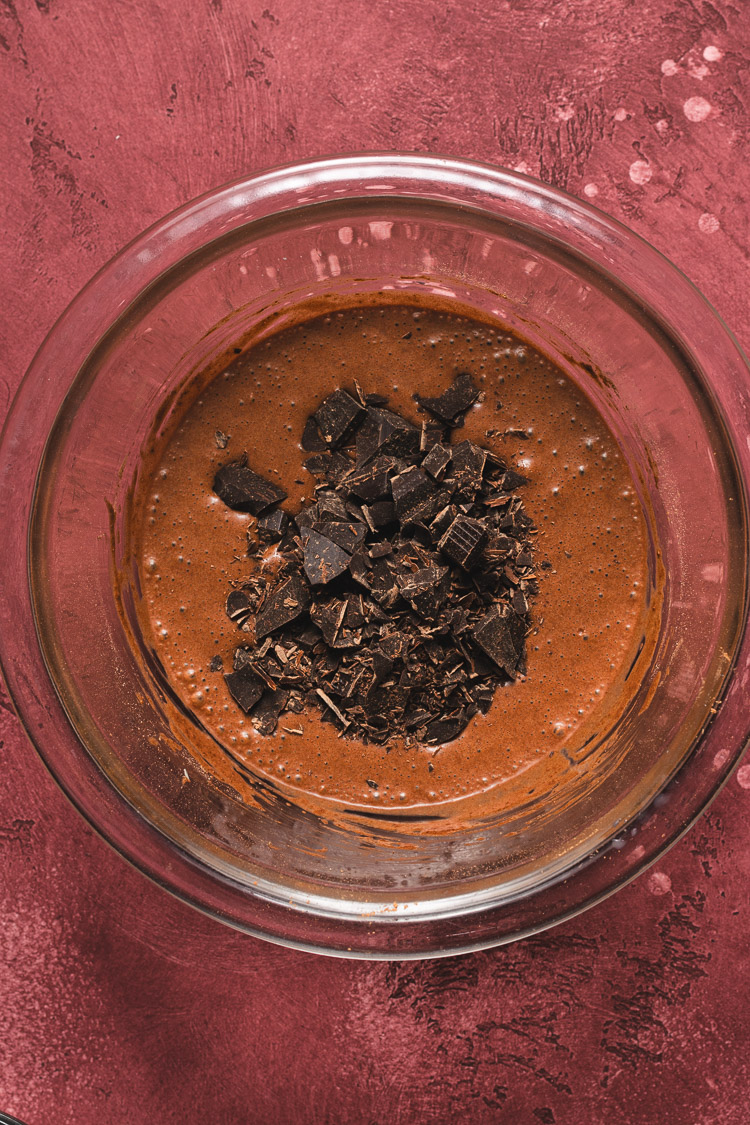
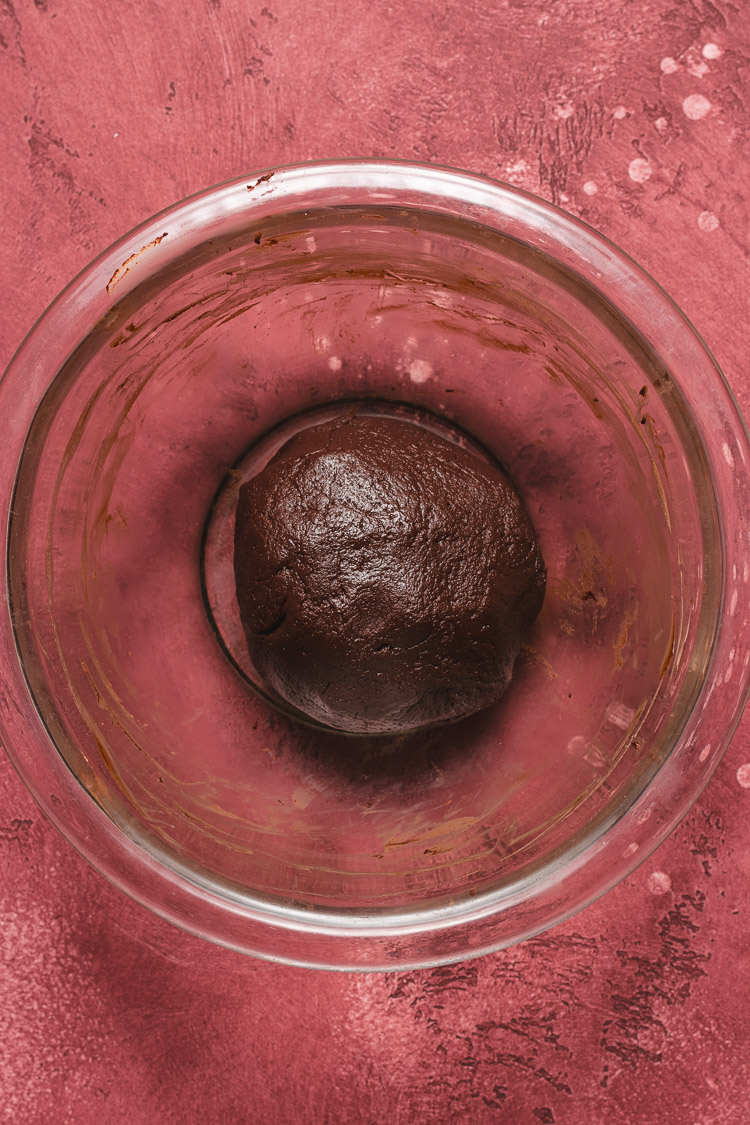
- Prepare the chocolate sheet while the dough is proofing. Whisk the dry ingredients together first, then whisk in the soy milk. Add chocolate and heat in the microwave in 20-second intervals. If you don’t have a microwave, you can do this on the stovetop and just constantly stir until a thick dough forms.
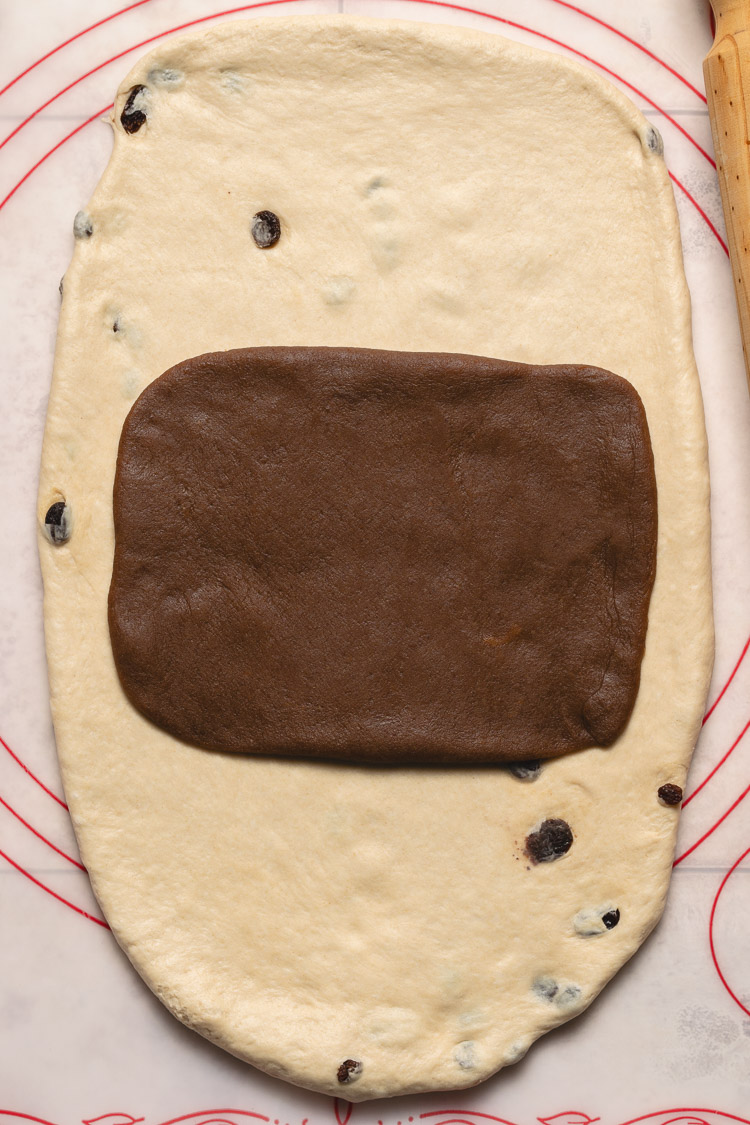
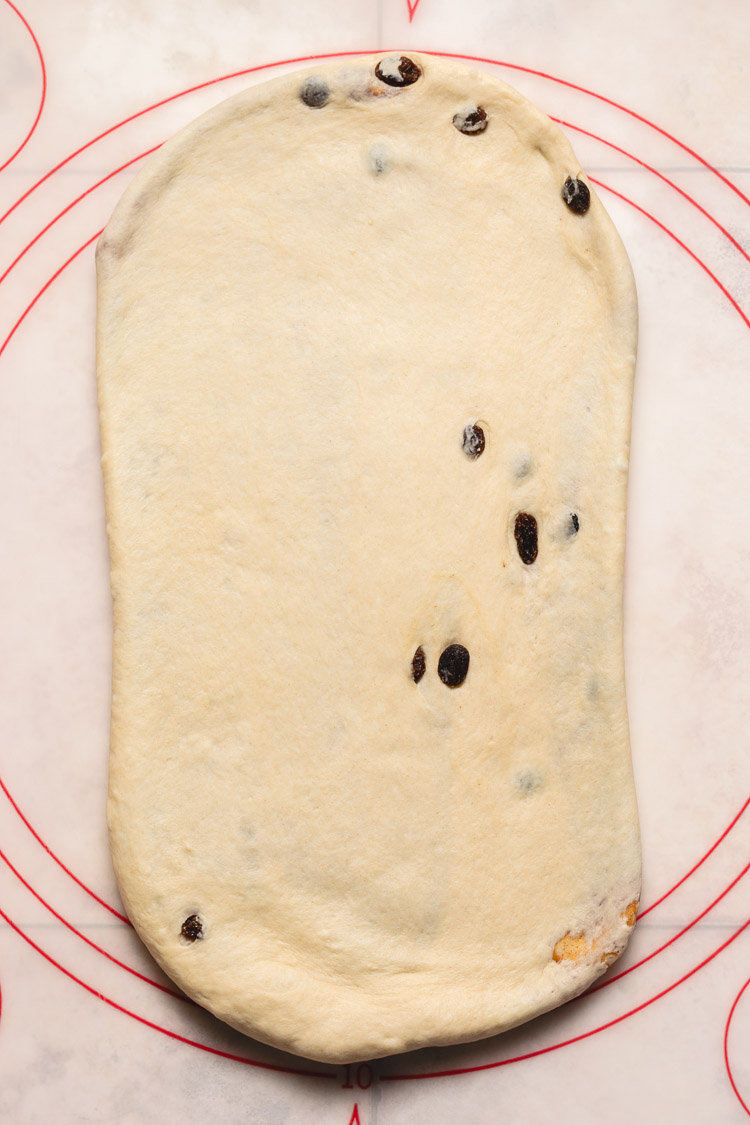
- Roll the dough out into a vertical rectangle and place the chocolate sheet in the center.
- Laminate the dough and chocolate sheet to create layers of chocolate throughout the dough.
How to Laminate the Dough
Note: The photos for the lamination are from my cinnamon marble milk bread, but the technique is the same.
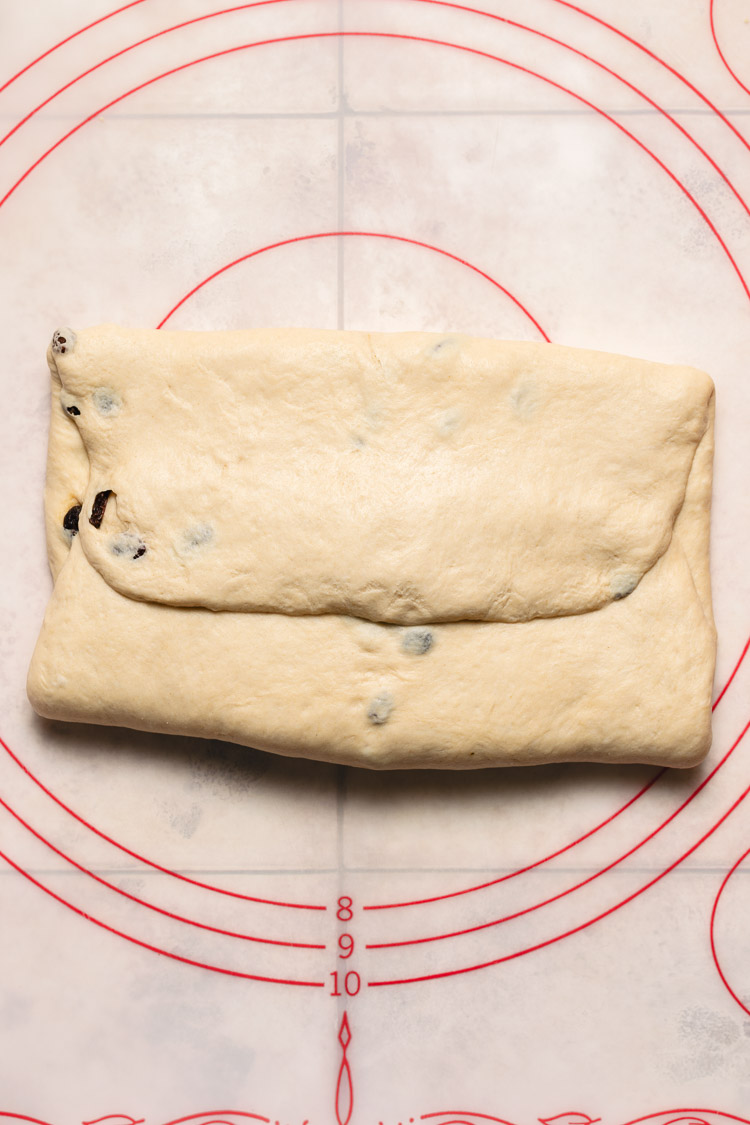
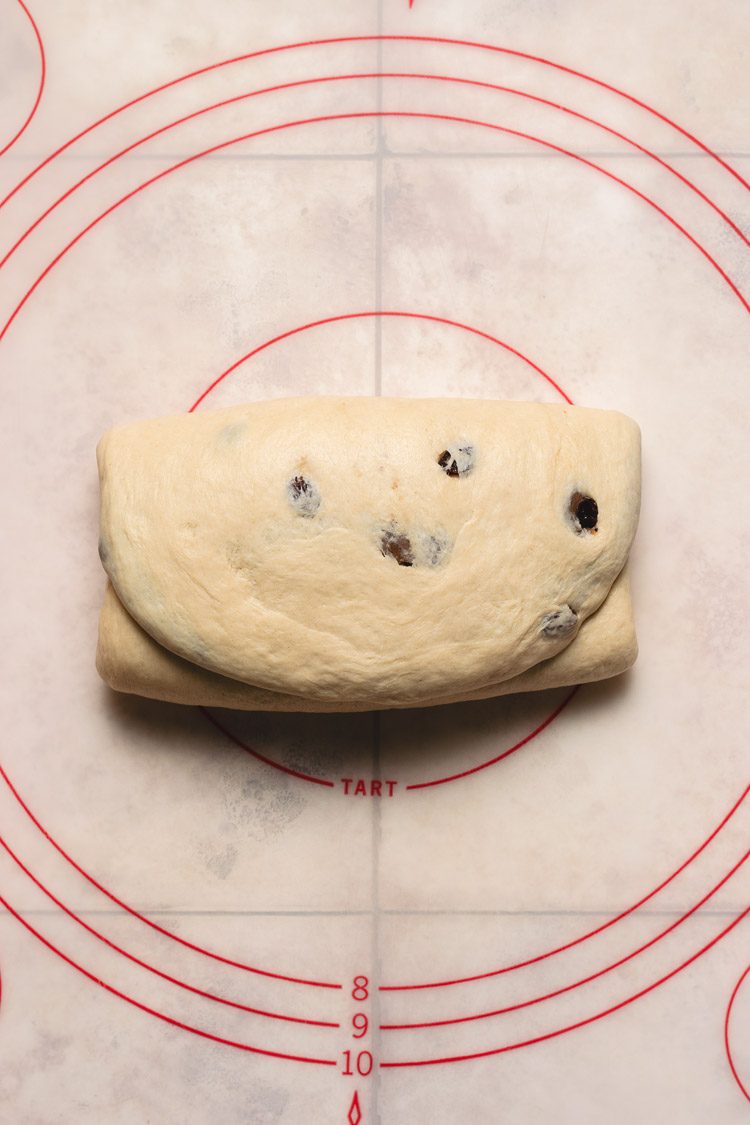
- Fold the dough into thirds over the chocolate sheet – you will now have a horizontal rectangle.
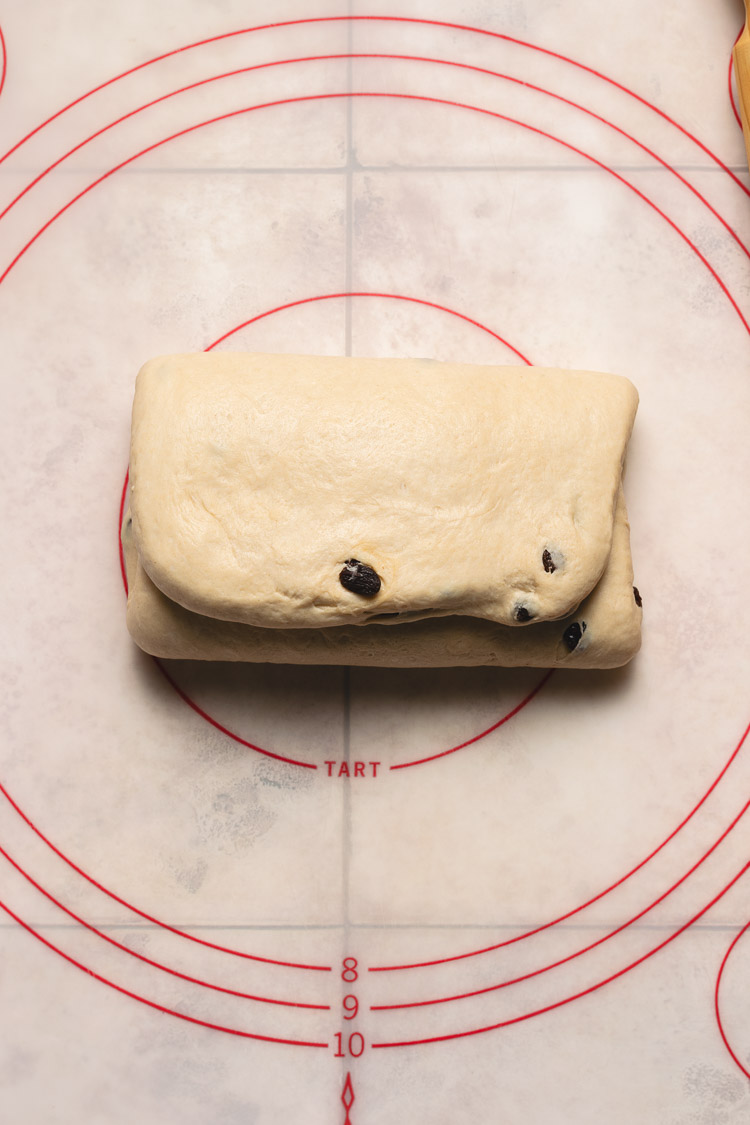
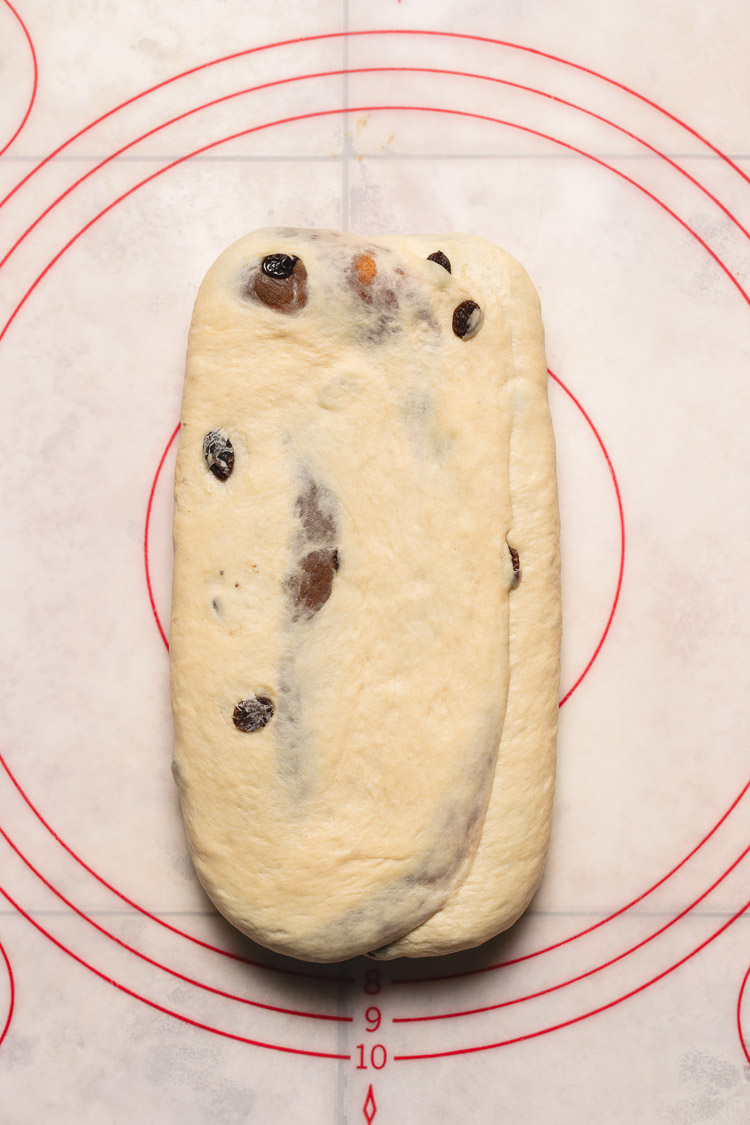
- Rotate the dough 90 degrees so it’s vertical to you.
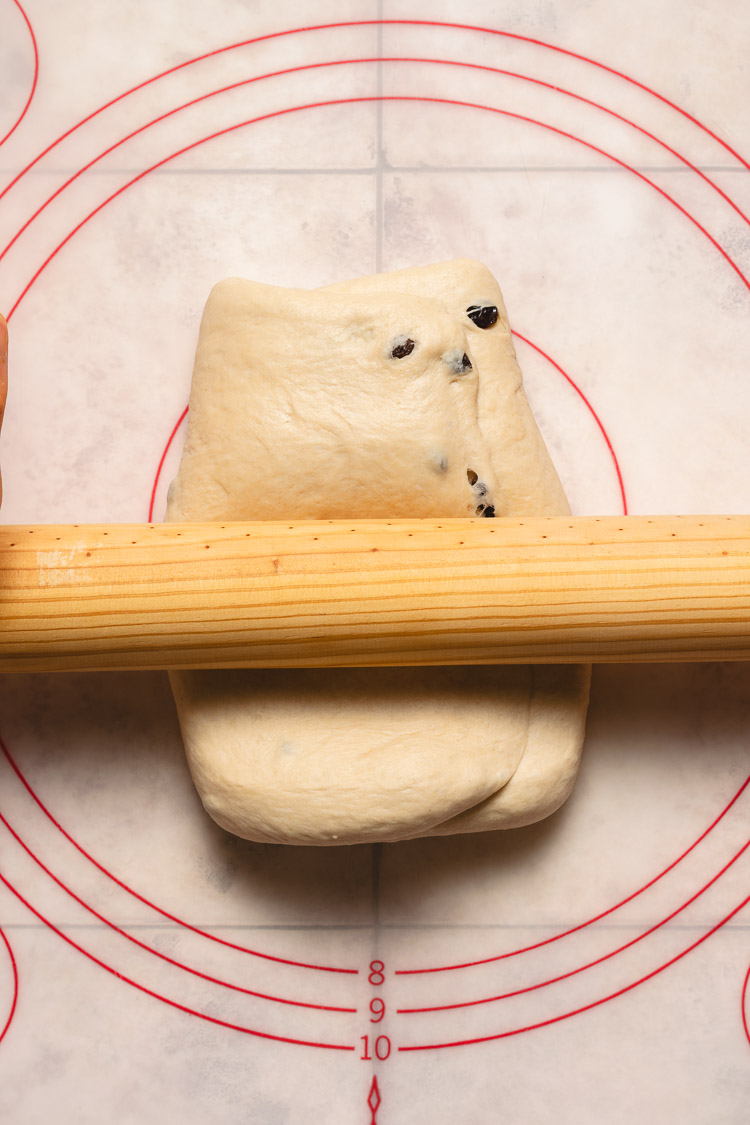
- Roll it out into another large vertical rectangle.
- Repeat folding, rotating, and rolling two to three more times.

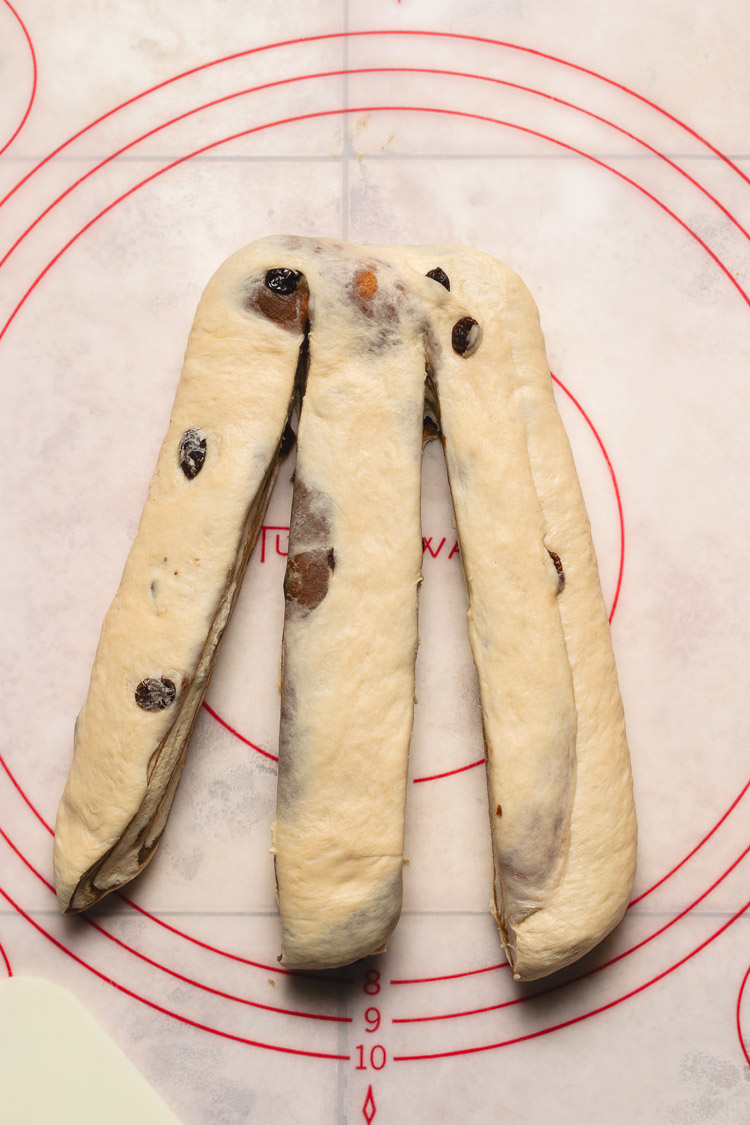
- Finally, roll the dough out into a rectangle the length of your bread pan.
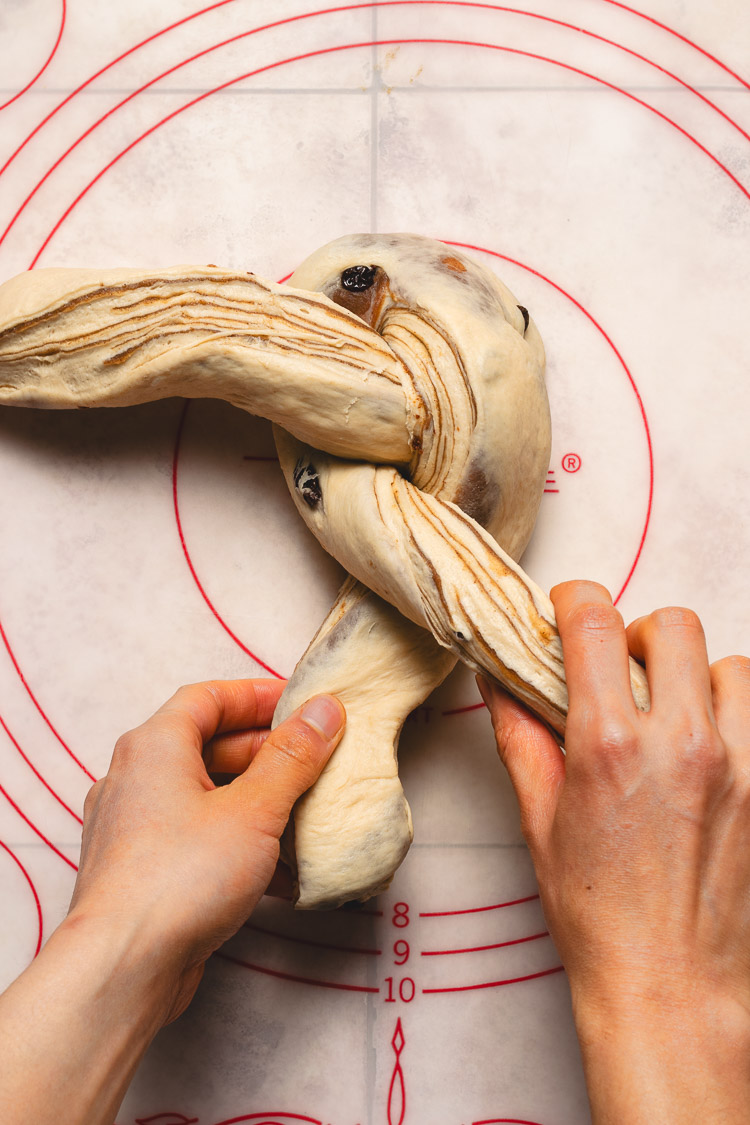
- Cut into three strips, but leave the top 1/2-inch of dough connected.
- Braid the strips together.
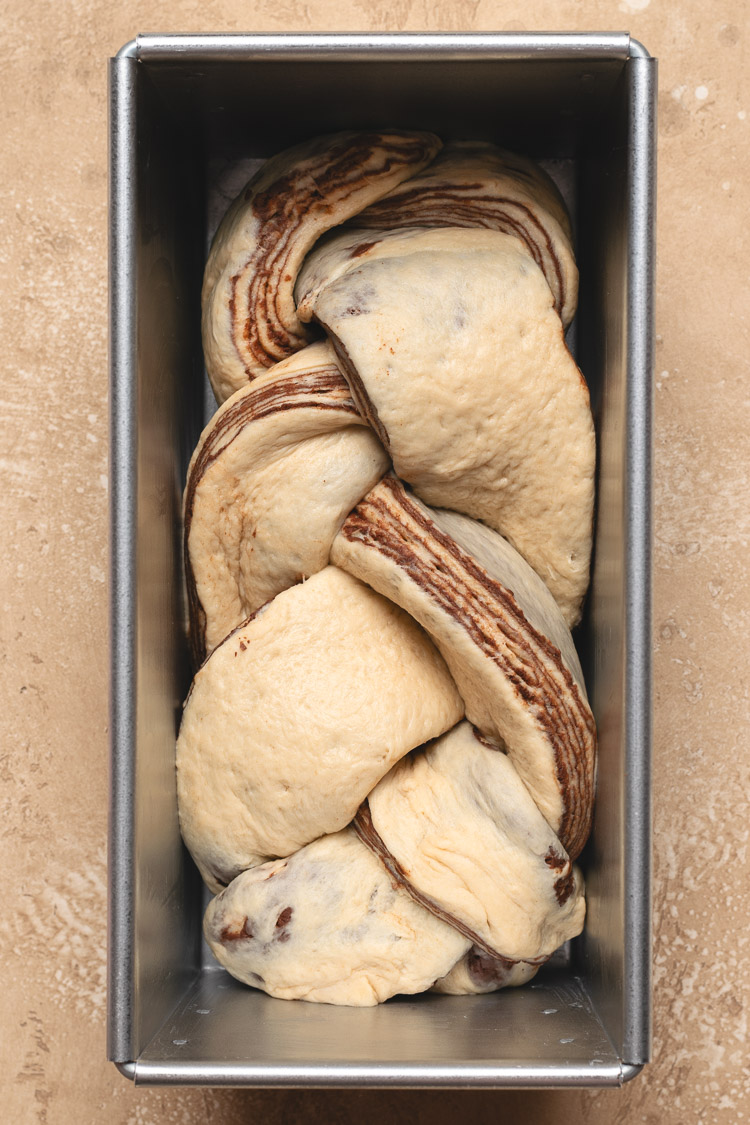
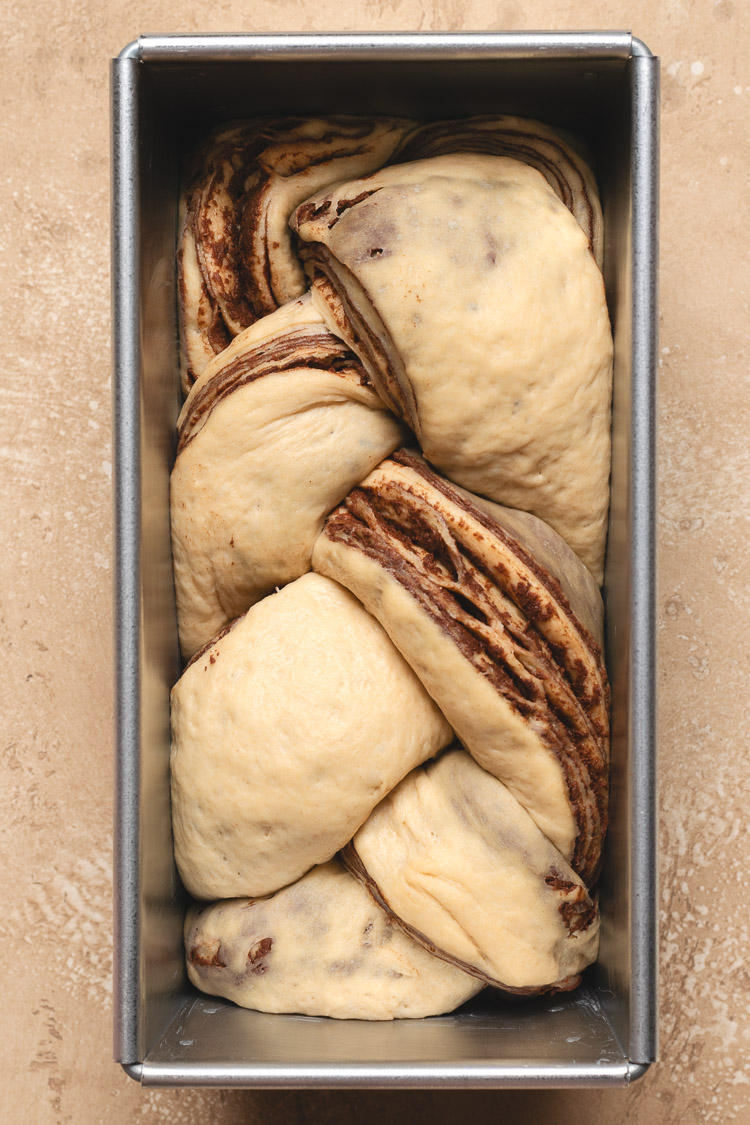
- Proof in bread pan until doubled in size.
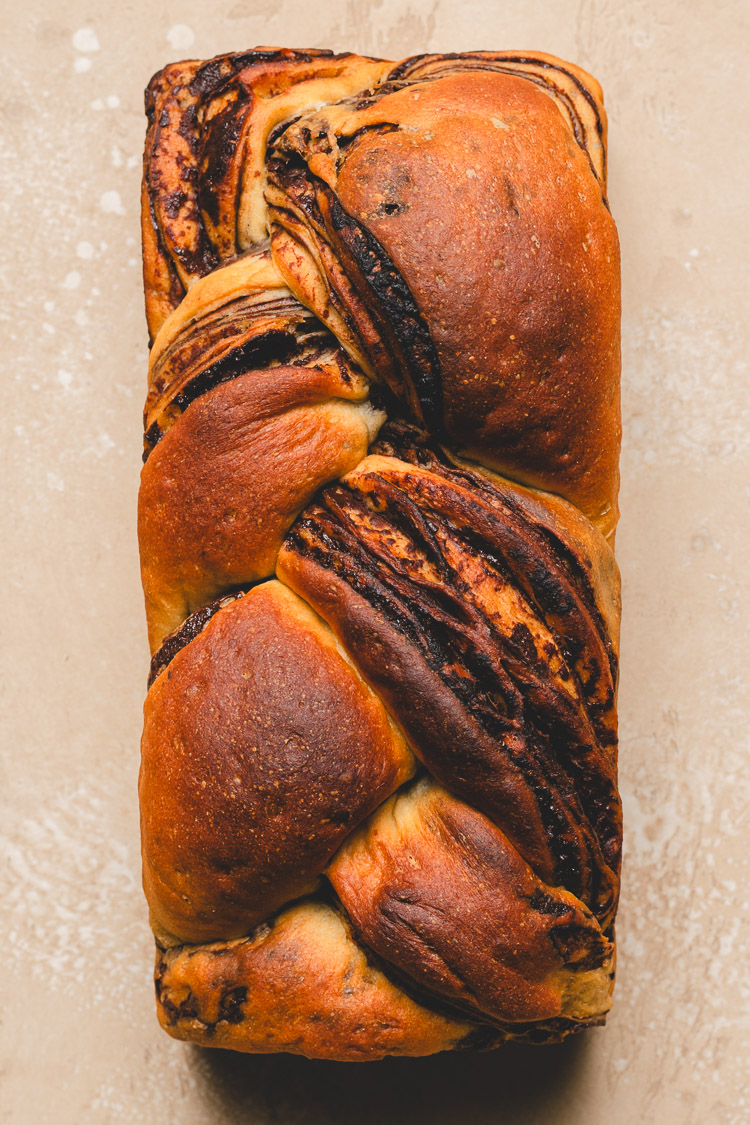
- Bake 35-45 minutes.
- Cool to room temperature before slicing.
Tips for Success
Knead until windowpane ⟶ If you stop kneading before your dough passes the windowpane test, it will rip more easily and the resulting bread won’t be as soft and pillowy.
Tip: If you’re having trouble getting the dough sufficiently kneaded, let it rest for 10 minutes to relax the gluten.
Use a stand mixer ⟶ Kneading the dough with a stand mixer will save you a lot of time and effort. This is a looser dough and will stick to your hands a lot in the beginning if you knead by hand. I use a Kitchen Aid mixer but there are more affordable stand mixers* that should do the trick (be sure you get a dough hook with yours!).
Chocolate sheet vs chocolate spread ⟶ To achieve the chocolate swirls in the bread, we make a chocolate sheet which has a firm dough texture. This is different from a chocolate babka which uses a chocolate spread/sauce. The chocolate sheet is a bit more effort to make (still pretty easy though!), but it’s easier to work with and much less messy than getting chocolate sauce everywhere. In Japan you can buy pre-made chocolate sheets, but they’re really easy to make yourself. Choose a good quality chocolate (I usually use Trader Joe’s dark chocolate).
Laminate the dough ⟶ To achieve the beautiful marbled look, we laminate the dough after adding the chocolate sheet. I like to do about 3-5 laminations.
Cool before slicing ⟶ I know it’s tempting to cut into it right after you take it out of the oven, but patience is key to a good bread! If you cut into it too early, your bread can lose a lot of moisture and may shrink.
Chocolate Marble Milk Bread FAQ
Can I use active dry yeast?
Yes but you must proof it first. To do this, warm the plant milk to 100°F (do not exceed 110°F or the yeast will die) and add the yeast and a teaspoon of sugar. Mix and then let the mixture sit for 5-10 minutes until it foams and bubbles. Then add the rest of the dough ingredients and continue with the recipe.
Can I use a different milk?
I’ve only made this bread with soy milk, but I think it should work with other milk alternatives. Try to use a creamier milk like oat milk or pea milk.
Can I knead by hand?
I included a method for kneading by hand since not everyone has a stand mixer. However, a stand mixer will produce the best results. It’s hard to sufficiently knead such a wet dough by hand. If you knead by hand and can’t reach the windowpane stage, your bread can still turn out tasty, it just won’t be as soft and pillowy. Knead until the dough is at least smooth and elastic (poke it with your finger and see if the dough springs back).
Why did my bread rip?
Bread will rip easily when the gluten isn’t developed enough. This can happen from not enough kneading or using the wrong flour(s). If you decide to make this bread with the whole wheat flour but not the vital wheat gluten, your bread will rip more easily. Using whole wheat flour also requires extra kneading. Kneading by hand will take longer especially if you are not used to it, which is why I highly recommend using a stand mixer if you can.
Can I skip braiding the dough?
The braiding step is just for visual appeal, so you can skip it if you want and just roll the dough up into a log.
How do I know when my bread is done?
The most accurate way to test is with a food thermometer*. Insert it in the center of your loaf about halfway in. The bread is done when it reaches 195°F/90°C. If you don’t have a food thermometer, you can use some sensory cues:
-The bread should be golden brown on the edges and top. Be aware that the top may brown more quickly, especially in a smaller oven (like a toaster oven), before the rest of the bread is cooked.
-It should sound hollow when you tap it.
-Gently push down on the bread, and if it springs back, it’s ready.
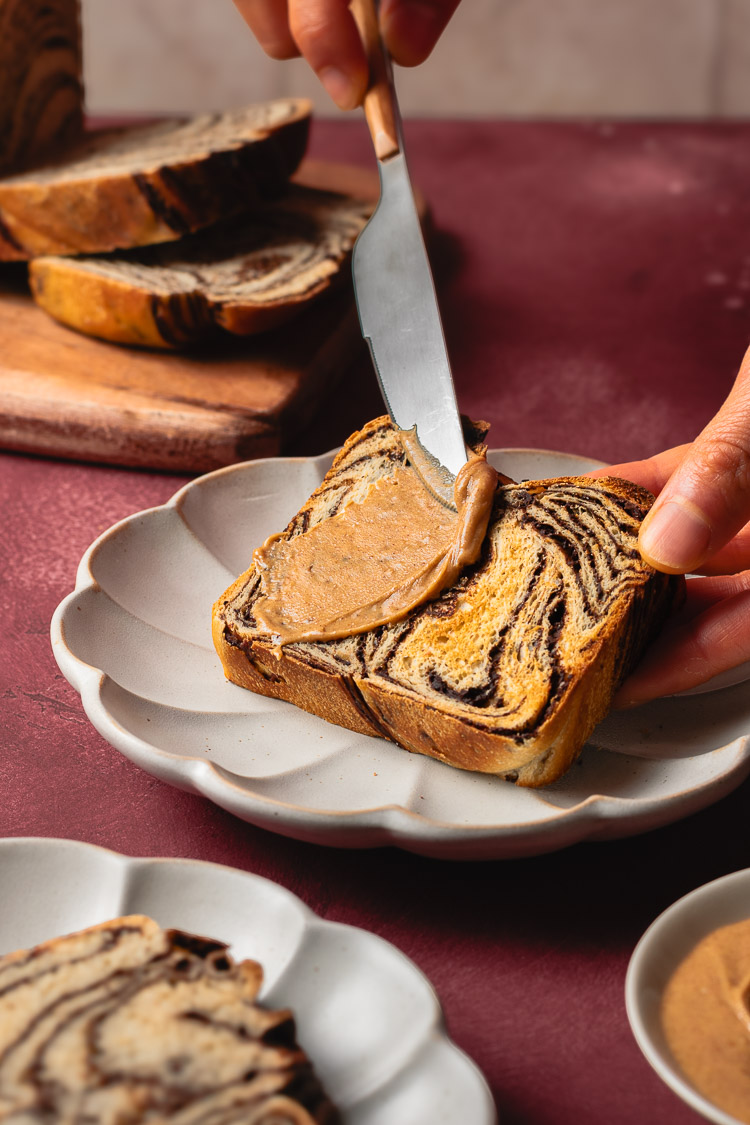
How do I serve chocolate marble milk bread?
This bread is best the day it’s made and can be eaten plain, toasted, with butter, nut butter, or even pb&j style. You could even turn it into French toast!
More Yeast Breads
- Vegan Anpan (Japanese Red Bean Bun) | ビーガンあんパン
- Vegan Melon Pan | ビーガンメロンパン
- Vegan Pumpkin Melon Pan | パンプキンメロンパン
- Seeded Multigrain Bread (No Knead)
If you make this chocolate marble milk bread, don’t forget to leave a comment/rating down below and tag me in your photos on instagram @ellielikes.cooking. I love seeing all of your tasty recreations!
Vegan Chocolate Marble Milk Bread (Shokupan)
Equipment
- 1 1 lb (1斤) Japanese rectangular loaf pan
Ingredients
Milk Bread
- 100 ml soy milk
- 65-80 ml water1
- 18 grams (1½ tbsp) sugar
- 120 grams (1 cup) bread flour
- 115 grams (1 cup – 1½ tsp) whole wheat flour2
- 2½ grams (1 tsp)
vital wheat gluten *2 - 2 grams (⅜ tsp) salt3
- 3½ grams (1 tsp) instant yeast
- 20 grams (1½ tbsp) salted vegan butter3 cut into small cubes
Chocolate Sheet
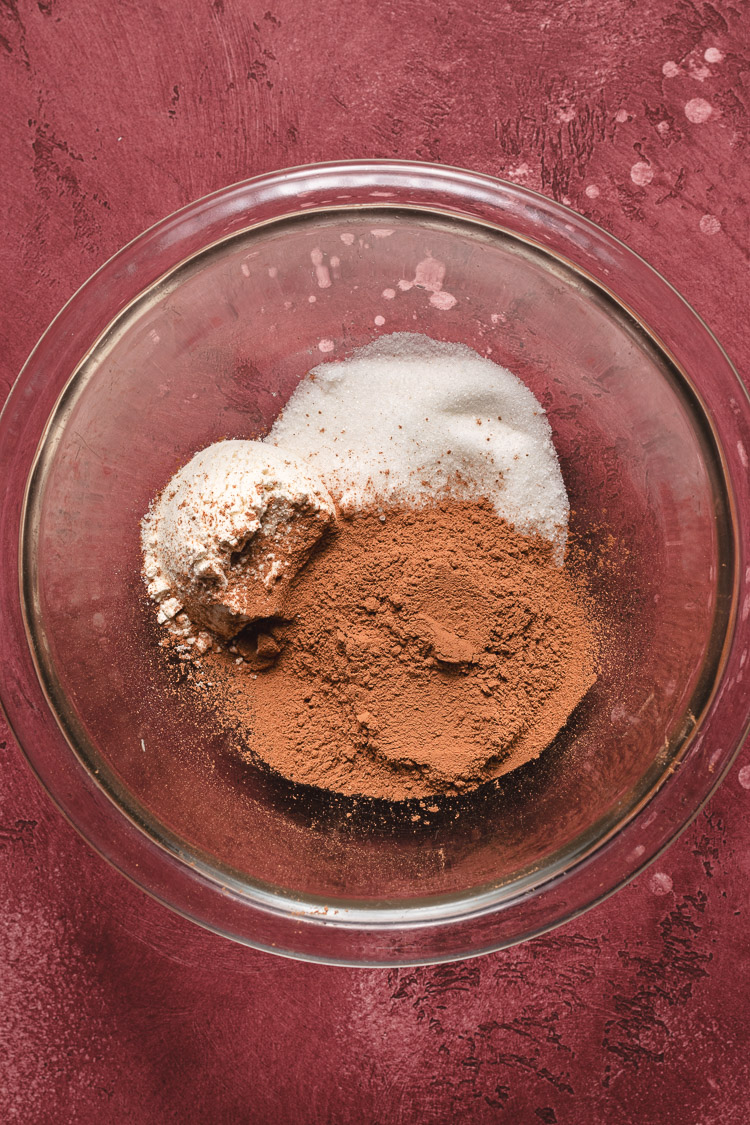
- 24 grams (2 tbsp) sugar
- 10 grams (2 tbsp) cocoa powder sifted
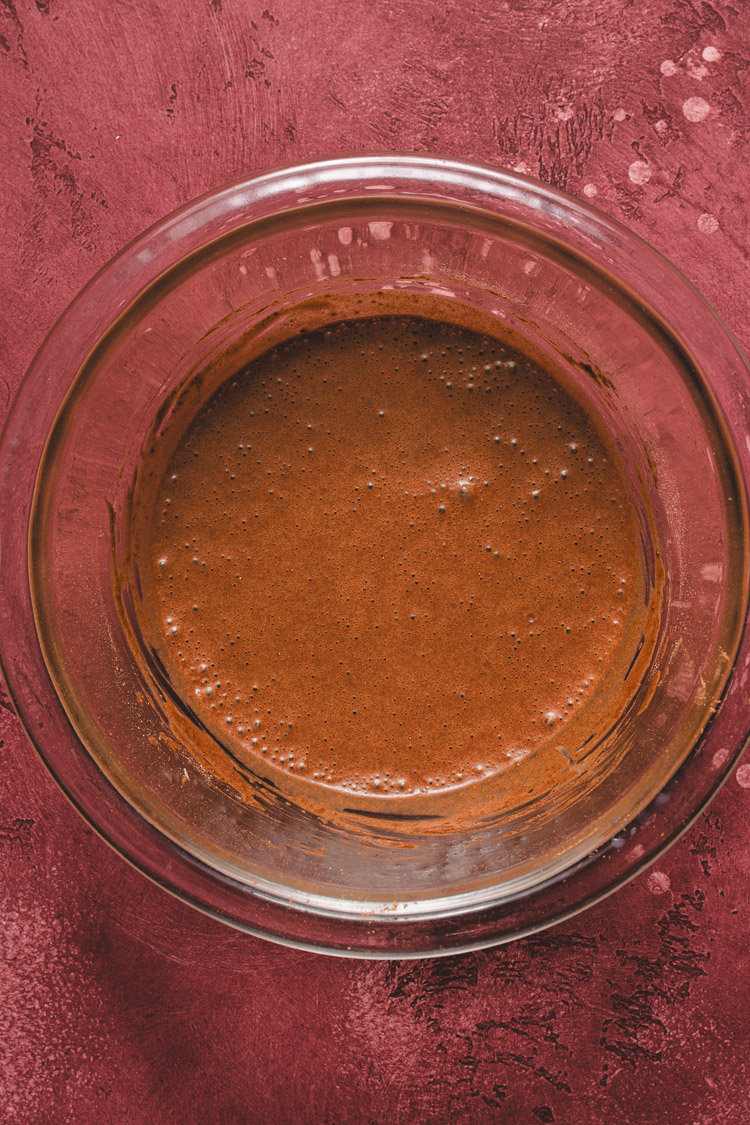
- 15 grams (2 tbsp) bread flour
- 75 ml soy milk
- 35-45 grams chocolate4 chips or chopped
Instructions
Make Dough (Stand Mixer – Recommended Method)
- Add soy milk, water1, and sugar to the bowl of your stand mixer. Add bread flour, wheat flour, and vital wheat gluten on top. Add salt to one side of the bowl and instant yeast to the other side.
- Attach a dough hook to your stand mixer. Turn it on at low speed to combine the ingredients, then gradually increase speed to medium as the dough comes together. Knead on medium for about 5 minutes. The dough should come together into a ball and loose some of its stickiness. Turn off the stand mixer, cover with a towel, and let the dough rest for 10 minutes.
- Turn the mixer back on at low speed and gradually add in the butter pieces. Increase the speed to medium as the butter gets incorporated into the dough. Continue kneading on medium speed (4-5) for about 10-15 minutes. You can stop to scrape down the dough every 5 minutes or so if needed.
Make Dough (By Hand)
- Clean a work surface or set out a large pastry mat and lightly dust with bread flour.
- Whisk together flours, vital wheat gluten, sugar, salt, and yeast. Pour in soy milk and water and use a wooden spoon to mix until a dough starts to form. Gather the dough into a loose ball and transfer to your work surface.
- Knead the dough for 5-10 minutes until a tight dough forms and it looses some of its stickiness. If the dough is too sticky, you can sprinkle some flour on top but try not to add too much flour or your bread will turn out dense. Dough will stick to your hands during kneading but just keep kneading! Cover and let the dough rest for 10 minutes.
- Stretch the dough out into a long rectangle and add the butter pieces on top. Roll up the dough and continue kneading. It will be very messy and greasy at first but keep going! After a couple minutes the dough will become smooth and easier to work with.
- Continue kneading for another 10-15 minutes.
Windowpane Test
- Use the windowpane test5 to check if the dough is sufficiently kneaded. Tear off a small piece of dough and gently stretch it into a square, pulling at the four corners. You should be able to stretch the dough out into a very thin membrane that light can pass through. If the dough tears easily, it needs to be kneaded longer.
First Proof
- Shape the dough into a ball and place in a large bowl (you can use the bowl of your stand mixer). Cover with a towel or plastic wrap and set on the counter to rise for 1-2 hours until doubled in size.
- To test if the dough is ready, use your finger to poke a hole in the center of the dough. If the hole doesn't close up, it's ready.
Chocolate Sheet
- While the dough is proofing, prepare the chocolate sheet. Whisk together sugar, cocoa powder, and bread flour in a microwave-safe bowl. Whisk in soy milk. Add chocolate chips. Microwave in 20-second intervals, stirring between each interval, until a thick dough forms (should take 1-2 minutes total).
- Place dough on a large piece of plastic wrap. Fold the plastic wrap over the dough into a rectangle, then use a rolling pin to roll out the chocolate sheet into the rectangle. (This will go in the center of the bread dough after the first proof.) Place in the fridge until ready to use.
Laminate Dough
- Punch down the dough and transfer to your work surface.
- Roll dough out into a vertical rectangle. Unwrap chocolate sheet and place it horizontally in the center of the bread dough.
- Fold dough into thirds over the chocolate sheet.
- Rotate the dough 90 degrees and roll it out again into a vertical rectangle. Fold dough into thirds and rotate 90 degrees. Repeat the process (roll out, fold into thirds, rotate) two more times.
- Cover the dough and let it rest for 10 minutes.
- Finally, roll the dough out into a rectangle the length of your bread pan. Cut into thirds about a 1/2-inch down from the top of the rectangle (leave the dough connected at the top), and braid the strands together.
- Grease your bread pan generously with vegan butter.
Second Proof
- Place the braided dough into your greased bread pan. Cover and let the dough proof until it reaches about 90% of the height of the pan (1-2 hours).
- When the dough has risen about 70% of the pan, preheat oven to 385°F/195°C (or 355°F/180°C for convection oven).
Bake
- Uncover the dough and place into the oven on the middle rack. Bake for 30-40 minutes, until the internal temperature reaches 195°F/90°C. It should be nicely browned on the outside and spring back when you push on it. Tent with foil if the top is browning too quickly.
Cool
- Tap the pan on the countertop 1-2 times to let water vapor escape (this prevents the bread from shrinking).
- Turn the pan on its side and give it a few thrusts to slide the bread out. Place the bread on a wire rack to cool completely.
- Let the bread cool completely before slicing so the structure can set. If you cut into the bread too soon, it may shrink and lose moisture.
Store
- You can store the cooled bread in a bag with the air removed for 2 days at room temperature. Slice the bread when you're going to eat it, otherwise the slices will dry out.
- For longer storage, freeze slices of the bread for up to 2 months. Pop them into the toaster when you're ready to eat.
Notes

*Disclosure: This page may contain affiliate links. As an Amazon Associate I earn from qualifying purchases, but the price remains the same to you. Thank you for supporting Ellie Likes Cooking!
Save for later!